 Ali Kamaly
Automate a Keysight Power Supply with Python in 2026 (E36100/E36300)
A working guide to driving Keysight bench supplies from Python: VISA addressing, the SCPI commands you actually need, current limits done safely, multi-channel sequencing, and a complete VI sweep script.
A Keysight bench power supply is controlled from Python through PyVISA using SCPI commands over USB, LAN, or GPIB. The sequence that matters is always the same: set the voltage, set the current limit, enable the output, measure, disable. Getting the order right is a safety property, not a style preference.
This guide covers the E36100 series single-output supplies and the E36300 series triple-output supplies, with working code for connection, multi-channel control, current limiting, and a complete VI sweep.
Setup
Install PyVISA and a VISA backend.
pip install pyvisa pyvisa-pyFor the backend you have three options:
- •Keysight IO Libraries Suite. Free, and the most reliable choice with Keysight hardware. Covers USB, LAN, and GPIB. See Keysight IO Libraries.
- •NI-VISA. Also free, also fine, and already present if you have an NI stack.
- •pyvisa-py. Pure Python, no installer. Works well over LAN, is workable over USB, and does not support GPIB without extra packages.
Finding your instrument
import pyvisa

rm = pyvisa.ResourceManager()
for resource in rm.list_resources():
    try:
        inst = rm.open_resource(resource)
        inst.timeout = 2000
        print(f"{resource}  ->  {inst.query('*IDN?').strip()}")
        inst.close()
    except Exception as exc:
        print(f"{resource}  ->  no response ({exc})")
You are looking for a line like:
TCPIP0::192.168.1.42::inst0::INSTR -> Keysight Technologies,E36313A,MY59001234,1.0.5-1.0.3Three address forms you will meet:
| Interface | Resource string |
|---|---|
| LAN (LXI) | TCPIP0::192.168.1.42::inst0::INSTR |
| USB | USB0::0x2A8D::0x1002::MY59001234::INSTR |
| GPIB | GPIB0::5::INSTR |
The 0x2A8D in the USB string is Keysight's vendor ID. Anything starting 0x0957 is an older Agilent-branded unit and works identically.
The commands that matter
You need about eight. The rest of the SCPI tree is for cases you will meet rarely.
| Command | Purpose |
|---|---|
*IDN? | Identify. Always your first query |
*RST | Reset to a known state. Always do this at the start |
VOLT <v> | Set output voltage |
CURR <a> | Set current limit |
OUTP ON / OUTP OFF | Enable and disable the output |
MEAS:VOLT? | Measure actual output voltage |
MEAS:CURR? | Measure actual output current |
INST:NSEL <n> | Select channel on multi-output supplies |
SYST:ERR? | Read the error queue |
A minimal, safe session
import pyvisa

rm = pyvisa.ResourceManager()
psu = rm.open_resource("TCPIP0::192.168.1.42::inst0::INSTR")
psu.timeout = 5000

print(psu.query("*IDN?").strip())
psu.write("*RST")

# Order matters: limit first, output last.
psu.write("VOLT 3.3")
psu.write("CURR 0.5")
psu.write("OUTP ON")

print(f"V = {float(psu.query('MEAS:VOLT?')):.4f} V")
print(f"I = {float(psu.query('MEAS:CURR?')):.4f} A")

psu.write("OUTP OFF")
psu.close()
The ordering rule. Set voltage and current limit while the output is off, then enable. If you enable first and set the limit second, the device under test sees the supply's previous limit for however long the two commands take. On a fresh unit that is the full rated current.
Checking for errors properly
SCPI instruments do not raise exceptions. A malformed command is silently queued as an error and the script carries on producing wrong results.
def check(inst):
    errors = []
    while True:
        code, message = inst.query("SYST:ERR?").strip().split(",", 1)
        if int(code) == 0:
            break
        errors.append(f"{code}: {message.strip()}")
    if errors:
        raise RuntimeError("instrument errors: " + "; ".join(errors))
Call it after each configuration block. This one function catches more real bugs than anything else in this guide.
Multi-channel supplies
The E36300 series has three outputs. Two addressing styles work.
Select then command:
psu.write("INST:NSEL 1")
psu.write("VOLT 3.3")
psu.write("CURR 0.5")
Channel list, no selection change:
psu.write("VOLT 3.3,(@1)")
psu.write("CURR 0.5,(@1)")
psu.write("VOLT 1.8,(@2)")
psu.write("OUTP ON,(@1,2)")
The channel list form is safer in longer scripts because it does not depend on hidden state. If a function elsewhere changes the selected channel, the select-then-command style silently programs the wrong output.
Sequenced power-up matters for multi-rail devices:
import time

psu.write("VOLT 3.3,(@1)"); psu.write("CURR 0.5,(@1)")
psu.write("VOLT 1.8,(@2)"); psu.write("CURR 1.0,(@2)")

psu.write("OUTP ON,(@1)")     # core rail first
time.sleep(0.05)
psu.write("OUTP ON,(@2)")     # then IO rail
A complete VI sweep
The most common real task: step the input voltage, measure current at each point, record it, and check limits.
import csv
import time
import pyvisa

PSU_ADDR = "TCPIP0::192.168.1.42::inst0::INSTR"
V_START, V_STOP, V_STEP = 3.0, 3.6, 0.1
I_LIMIT = 0.5
SETTLE_S = 0.2

rm = pyvisa.ResourceManager()
psu = rm.open_resource(PSU_ADDR)
psu.timeout = 5000

try:
    print(psu.query("*IDN?").strip())
    psu.write("*RST")
    psu.write("INST:NSEL 1")
    psu.write(f"CURR {I_LIMIT}")
    psu.write(f"VOLT {V_START}")
    psu.write("OUTP ON")
    check(psu)

    rows = []
    v = V_START
    while v <= V_STOP + 1e-9:
        psu.write(f"VOLT {v:.3f}")
        time.sleep(SETTLE_S)
        v_meas = float(psu.query("MEAS:VOLT?"))
        i_meas = float(psu.query("MEAS:CURR?"))
        power = v_meas * i_meas
        rows.append({"v_set": round(v, 3), "v_meas": v_meas,
                     "i_meas": i_meas, "p_w": round(power, 6)})
        print(f"{v:.2f} V set -> {v_meas:.4f} V, {i_meas*1000:.2f} mA, {power*1000:.1f} mW")
        v += V_STEP

    check(psu)

finally:
    psu.write("OUTP OFF")
    psu.close()

with open("vi_sweep.csv", "w", newline="") as f:
    writer = csv.DictWriter(f, fieldnames=["v_set", "v_meas", "i_meas", "p_w"])
    writer.writeheader()
    writer.writerows(rows)

over = [r for r in rows if r["i_meas"] > 0.4]
print(f"{len(over)} of {len(rows)} points drew more than 400 mA")
Three things in that script are the difference between a demo and something you can leave running.
- •The `try/finally`. If anything raises, the output still gets disabled. Without this, a crashed script leaves the DUT powered.
- •The settle delay. Instruments do not respond instantly. 200 ms is a reasonable starting point; reduce it only after checking that readings are stable.
- •The float comparison guard in the while condition.
v <= V_STOPwith floating-point accumulation drops the last point roughly half the time.
Reading the current limit state
Knowing whether the supply went into constant-current mode tells you the DUT drew more than expected.
status = int(psu.query("STAT:QUES:COND?"))
if status & 0x02:
    print("WARNING: supply is in constant-current mode, DUT is drawing the limit")
Bit definitions vary slightly by model, so confirm against the programming guide for your unit. For the E36300 family, bit 1 indicates CC mode on the selected channel.
Where this stops being enough
The script above drives one instrument. A real characterisation run needs a supply, a DMM measuring the output rail, an electronic load, and possibly a scope for transients, all sequenced with correlated timestamps and a report at the end.
That is where the line count grows from eighty to eight hundred, and where most of the maintenance burden lives. See automating a Rigol oscilloscope for the same pattern on the capture side, and programmable DC power supply for the hardware selection question.
Reading back what you set, and why it matters
Setting a value and assuming it took is the most common source of quietly wrong results.
psu.write("VOLT 3.3")
setpoint = float(psu.query("VOLT?"))
if abs(setpoint - 3.3) > 0.001:
    raise RuntimeError(f"setpoint not accepted: asked 3.3, got {setpoint}")
Instruments clamp silently. Ask an E36103B for 25 V when its range is 20 V and it will take the command, apply 20 V, and report no error unless you query. Your log then says 25 V and the DUT saw 20 V, which is the kind of discrepancy that costs a week of debugging months later.
Query back every setpoint that matters. It costs one round trip.
Speed: where the time actually goes
A sweep of 200 points that should take 40 seconds often takes four minutes. The cause is almost never the instrument.
| Cause | Cost | Fix |
|---|---|---|
| Over-long settle delays | Usually the largest | Measure actual settling once, then set the delay from data |
| Separate write calls per parameter | ~10 ms each over LAN | Combine with semicolons: VOLT 3.3;CURR 0.5 |
Querying SYST:ERR? inside the loop | ~10 ms per iteration | Check once per block, not per point |
| ASCII transfer of large arrays | Large | Use binary formats |
*OPC? after every command | Significant | Only where genuinely needed |
Combining commands is the easy win:
psu.write(f"VOLT {v:.3f};:CURR {i:.3f}")The leading colon after the semicolon returns to the root of the command tree, which matters when the two commands are in different subsystems. Omitting it is a common and confusing bug.
Measure settling properly rather than guessing: step the voltage, then poll MEAS:VOLT? in a tight loop with timestamps and see when it stabilises. Most benches find the real number is well under the 200 ms people default to.
Protecting the DUT in software
A supply under program control can destroy hardware faster than a human can react. Four habits that cost nothing and have saved a great deal of silicon.
1. Set the protection before the output, every time.
psu.write(":SOUR:VOLT:PROT:LEV 3.60")     # OVP trips above 3.6 V
psu.write(":SOUR:CURR:LEV 0.500")         # current limit, the real protection
psu.write(":SOUR:VOLT:LEV 3.30")
psu.write(":OUTP ON")                      # only now
Order matters. Setting the output on first and the limits second leaves a window, and windows are where boards die.
2. Ramp rather than step into an unknown load.
for v in [x / 10 for x in range(0, 34)]:   # 0.0 to 3.3 V in 100 mV steps
    psu.write(f":SOUR:VOLT {v}")
    time.sleep(0.05)
    if float(psu.query(":MEAS:CURR?")) > 0.45:
        psu.write(":OUTP OFF")
        raise RuntimeError(f"overcurrent at {v:.1f} V, output disabled")
3. Check whether protection tripped, do not assume it did not.
if int(psu.query(":SOUR:VOLT:PROT:TRIP?")):
    raise RuntimeError("OVP tripped, DUT may be damaged")
4. Turn the output off in a `finally` block. An unhandled exception should never leave a rail energised on an unattended bench.
try:
    run_sweep(psu, dmm)
finally:
    psu.write(":OUTP OFF")
    psu.close()
That last one is the difference between a failed run and a fire risk on an overnight soak.
Which Keysight supply you have changes the commands
The :SOUR subsystem is broadly consistent across the range, but three differences catch people out.
| Family | Channels | Note |
|---|---|---|
| E3600 series (E36103B, E36313A) | 1 to 3 | Bench workhorses. INST:NSEL selects the channel |
| N6700 modular mainframe | Up to 4 modules per frame | The bay number is the SCPI channel. INST:NSEL 3 addresses bay 3 |
| E3640 series (legacy) | 1 | Older command set, no :SOUR prefix on some commands |
| Advanced Power System (N7900) | 1 to 2 | Adds arbitrary waveform and fast transient capability |
The N6700 case is the one worth internalising if you have a mainframe: swapping a module between bays changes its SCPI channel number, so a sequence that worked yesterday addresses a different supply today. Record the bay-to-module mapping alongside the test, not in someone's memory. Keysight E36313A programming covers the three-channel case in detail.
Common mistakes
- •Output on before limits are set. Covered above. This is the one that costs boards.
- •No `finally` block. An exception mid-sweep leaves the rail live.
- •Using `MEAS:VOLT?` to verify the setting. That reads the actual output, which is what you want for measurement and not what you want for confirming the command applied. Query
:SOUR:VOLT?for the setpoint. - •Ignoring settling time. A supply reaches its setpoint in milliseconds, but the DUT's rail behind a bulk capacitor does not. Measure the settling once and put a real number in your sleep, or poll until stable.
- •Forgetting remote sense on long leads. Two metres of test lead at 500 mA is a real voltage drop. Four-wire sense or accept the error, but know which you chose.
- •Assuming the current limit is a protection feature. It is a regulation mode: the supply moves into constant current and keeps delivering. For a hard cutoff you want OCP enabled, not just a limit set.
- •Hardcoding the channel number. See the N6700 note above.
Related reading
- •Keysight E36313A programming, model-specific detail
- •Keysight IO Libraries, the VISA backend
- •PyVISA tutorial, the library fundamentals
- •SCPI command cheat sheet, the commands across instrument classes
- •How to automate a VI curve sweep, the multi-instrument version of this
- •Programmable DC power supply, choosing the hardware
- •Automate multimeter measurements with Python, the measurement half
- •Instrument control with VISA and SCPI, the protocol layer
- •Keysight Command Expert alternatives, finding commands for your model
- •GPIB vs USB vs LAN, picking the interface
- •Automated test report generation, turning the sweep into a document
- •Python instrument control libraries compared, what to build on
- •Free instrument control software, the zero-cost stack
- •NI TestStand alternatives, when the sweep becomes one step of a production sequence
Where TestFlow fits
A power supply is never the whole test. It sets a condition while something else measures, and wiring those together by hand is where the day goes.
- 1
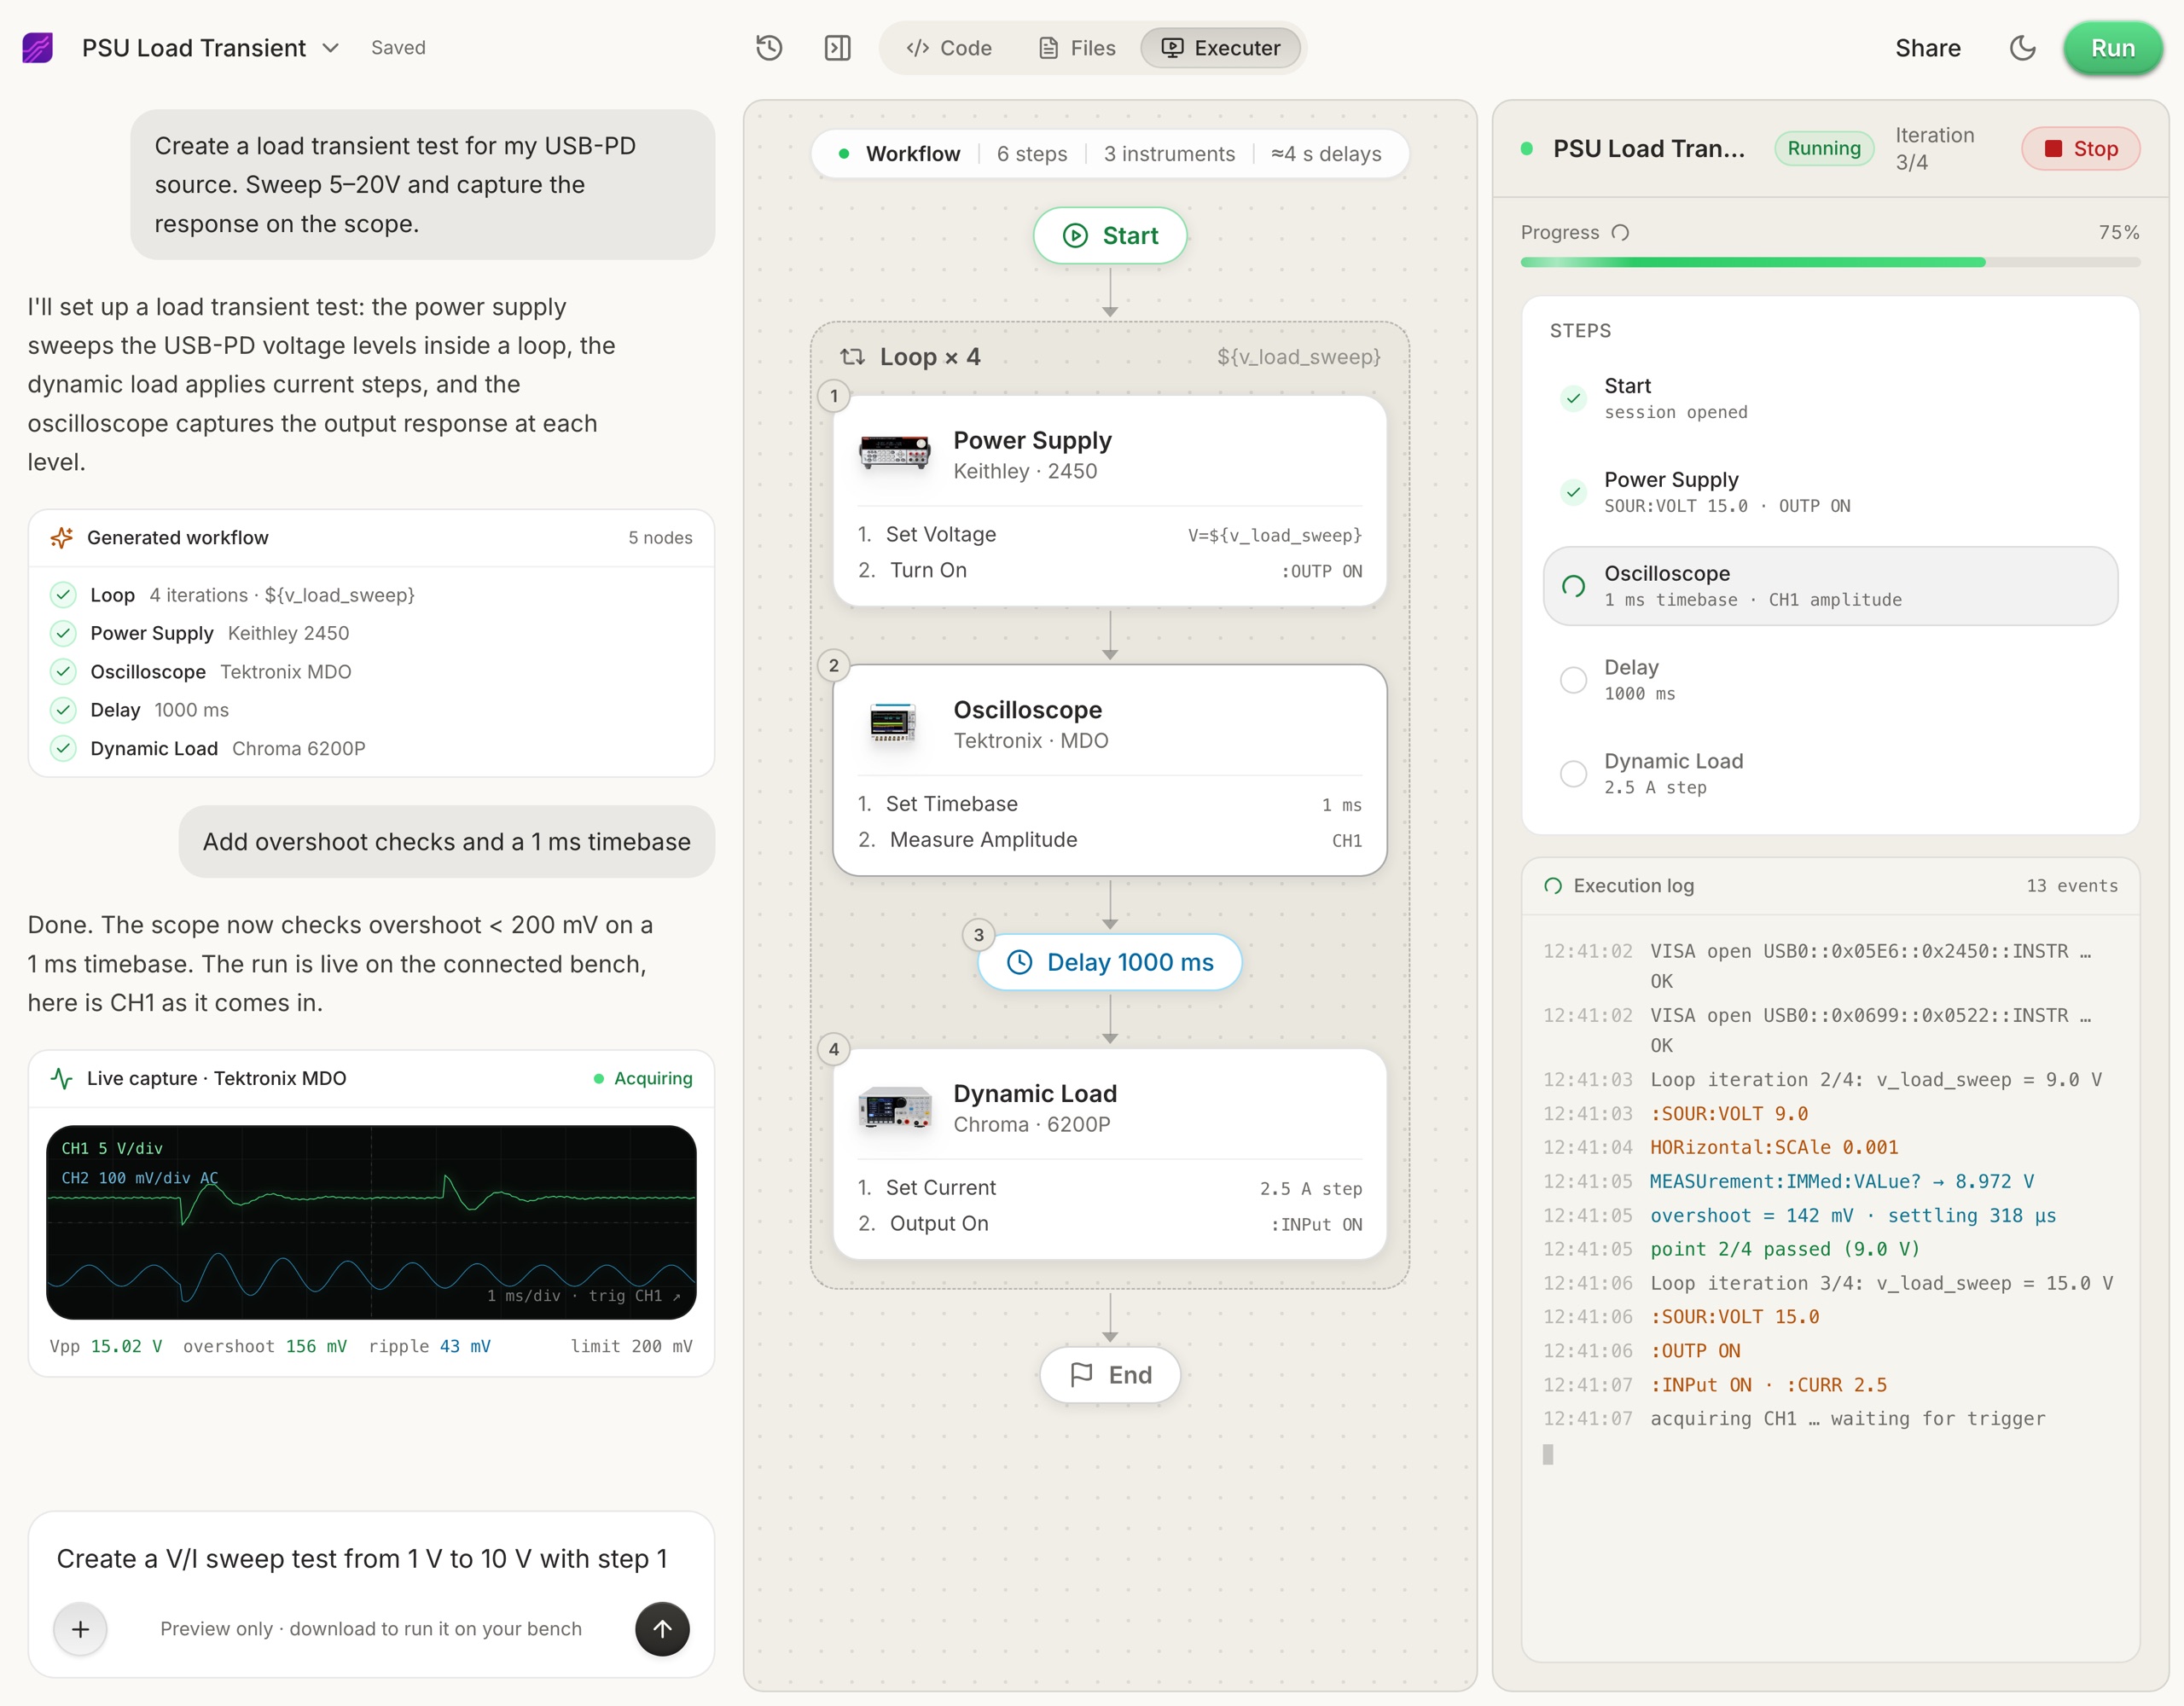
Connect your instruments. Pick the manufacturer and model, paste the VISA address (USB, LAN, GPIB, or serial), and the agent knows what is on your bench. No bench yet? Use a placeholder address, build the full automation, and swap in the real address when you are in the lab.
- 2
Tell the agent what to test, in plain English. For example, "run a VI sweep from 1 to 10 V in 1 V steps at 0.5 A load current," or "suggest the tests for a power-management device."
- 3
The agent builds the complete workflow in seconds. Instrument-aware automation appears on the canvas, with the generated scripts visible in a code panel you can inspect and edit.
- 4
Run it in your lab. Click Run and the status panel streams results step by step, with measured values inline (VOUT = 3.301 V, asserted 3.2 to 3.4 V, PASS). One click exports a structured PDF report, or the raw results as CSV.
- Vendor-neutral by design. One workflow drives Keysight, Tektronix, Rohde & Schwarz, NI, Rigol, Keithley, Anritsu, and more over standard VISA and SCPI.
- Browser-based and shareable. Workflows live in your workspace, so a sequence built in one lab runs the same way in another.
- Free version to start. Sign in at app.testflowinc.com and build your first workflow today; plans and quotes are on the pricing page.

The step-by-step walkthrough, VISA address formats, and Test Planner prompts are all in the TestFlow product guide.
Frequently asked questions
How do I connect to a Keysight power supply from Python?
Install pyvisa and a VISA backend such as Keysight IO Libraries Suite or NI-VISA, then open the instrument by its VISA resource string, for example TCPIP0::192.168.1.42::inst0::INSTR for LAN or a USB0::0x2A8D::... string for USB.
What SCPI command sets the voltage on a Keysight supply?
VOLT <value> sets the voltage on the selected channel, CURR <value> sets the current limit, and OUTP ON enables the output. On multi-channel supplies select the channel first with INST:NSEL <n> or append the channel list.
How do I read back the actual output current?
MEAS:CURR? triggers a fresh measurement and returns the actual current. FETC:CURR? returns the last measurement without re-triggering. Use MEAS for a new reading and FETC when you have already triggered.
Do I need Keysight IO Libraries to use Python with a Keysight supply?
You need a VISA backend. Keysight IO Libraries Suite is free and works well, NI-VISA also works, and pyvisa-py is a pure-Python backend that avoids installing either, though it has narrower interface support.
How do I set a current limit safely before applying power?
Set the current limit before enabling the output, never after. Send VOLT, then CURR, then OUTP ON. Setting the limit after the output is live can expose the device under test to the previous, possibly much higher, limit.
Can I control multiple channels at once on an E36313A?
Yes. Use INST:NSEL to select a channel for subsequent commands, or use the channel list form such as VOLT 3.3,(@1) to address a channel directly without changing the selection.
Ready to automate your lab?
Connect your instruments, describe a test in plain English, and TestFlow builds and runs it in minutes.
Tags
Put it on your bench this week
A new way for testing, from specs to automated sequences, capture clean data, and accelerate your validation cycle.