How to Automate a Rigol Oscilloscope with Python (SCPI + PyVISA Guide for 2026)
Control a Rigol DS1054Z or any DS1000Z-series scope from Python: PyVISA setup, the SCPI commands that matter, automated measurements, and waveform capture.
The Rigol DS1054Z is probably the most common oscilloscope on engineering benches, and almost nobody automates it. Every measurement becomes knob-turning and screenshot-taking. This guide fixes that: by the end you will control a Rigol scope from Python over USB or LAN, run measurements automatically, and pull waveform data into NumPy for analysis.
Everything here applies to the DS1000Z series (DS1054Z, DS1074Z, DS1104Z) and translates with minor command changes to Rigol's newer DHO and MSO families. If your bench runs Tektronix instead, we wrote the same guide for it: automating a Tektronix oscilloscope with Python.
What you need
- •A Rigol oscilloscope with USB or LAN (the DS1054Z has both)
- •Python 3.9+
- •The pyVISA library, plus a VISA backend
- •15 minutes
Install the Python side:
pip install pyvisa pyvisa-py pyusb numpy matplotlibpyvisa-py is a pure-Python VISA backend, so you do not need NI or Keysight software installed. If you already have Keysight IO Libraries or NI-VISA on the machine, pyVISA will use those too. SCPI and VISA themselves are explained in our instrument control with VISA and SCPI primer.
Step 1: Find and connect to the scope
Plug in USB (or put the scope on your network) and list what VISA sees:
import pyvisa

rm = pyvisa.ResourceManager()
print(rm.list_resources())
# ('USB0::0x1AB1::0x04CE::DS1ZA170000000::INSTR',)
0x1AB1 is Rigol's USB vendor ID. Open the instrument and confirm identity:
scope = rm.open_resource("USB0::0x1AB1::0x04CE::DS1ZA170000000::INSTR")
scope.timeout = 5000  # ms
print(scope.query("*IDN?"))
# RIGOL TECHNOLOGIES,DS1054Z,DS1ZA170000000,00.04.04.SP4
On LAN, the resource string is simpler: TCPIP0::192.168.1.123::INSTR, with the IP from Utility, then IO Setting, then LAN on the scope's front panel.
The Rigol SCPI commands that matter
| What you want | Command |
|---|---|
| Identify the instrument | *IDN? |
| Autoscale the display | :AUToscale |
| Run / stop / single trigger | :RUN / :STOP / :SINGle |
| Set channel 1 vertical scale to 1 V/div | :CHANnel1:SCALe 1 |
| Set timebase to 1 ms/div | :TIMebase:MAIN:SCALe 0.001 |
| Trigger on channel 1 rising edge at 1.5 V | :TRIGger:EDGe:SOURce CHANnel1 and :TRIGger:EDGe:LEVel 1.5 |
| Measure peak-to-peak voltage | :MEASure:ITEM? VPP,CHANnel1 |
| Measure frequency | :MEASure:ITEM? FREQuency,CHANnel1 |
The full command set is in Rigol's DS1000Z programming guide, but those eight commands cover most bench automation.
Step 2: Automated measurements
A repeatable measurement script instead of reading numbers off the screen:
def measure(scope, item, channel="CHANnel1"):
    return float(scope.query(f":MEASure:ITEM? {item},{channel}"))

scope.write(":AUToscale")
vpp  = measure(scope, "VPP")
freq = measure(scope, "FREQuency")
vavg = measure(scope, "VAVG")

print(f"Vpp = {vpp:.3f} V, f = {freq:.1f} Hz, Vavg = {vavg:.3f} V")
Rigol returns 9.9e37 when a measurement is invalid (no signal, wrong trigger), so check for that value before trusting a result.
Step 3: Capture the waveform itself
Measurements summarize; sometimes you need the actual samples. The DS1000Z returns the 1,200 on-screen points in NORMal mode:
import numpy as np

scope.write(":WAVeform:SOURce CHANnel1")
scope.write(":WAVeform:MODE NORMal")
scope.write(":WAVeform:FORMat BYTE")

# Scaling factors from the preamble
xinc  = float(scope.query(":WAVeform:XINCrement?"))
yinc  = float(scope.query(":WAVeform:YINCrement?"))
yorig = float(scope.query(":WAVeform:YORigin?"))
yref  = float(scope.query(":WAVeform:YREFerence?"))

raw = scope.query_binary_values(":WAVeform:DATA?", datatype="B", container=np.array)

volts = (raw - yorig - yref) * yinc
time_s = np.arange(len(volts)) * xinc
pyVISA's query_binary_values handles the IEEE block header for you. Plot or save it:
import matplotlib.pyplot as plt

plt.plot(time_s * 1e3, volts)
plt.xlabel("Time (ms)")
plt.ylabel("Voltage (V)")
plt.title("Rigol DS1054Z capture")
plt.savefig("capture.png", dpi=150)
np.savetxt("capture.csv", np.column_stack([time_s, volts]), delimiter=",", header="time_s,volts")
To pull the deep memory (up to 12M points on the DS1054Z) instead of the screen data, stop the acquisition with :STOP, switch to :WAVeform:MODE RAW, and read in chunks using :WAVeform:STARt and :WAVeform:STOP. Keep NORMal mode for everyday automation; it is faster and rarely the bottleneck.
Troubleshooting
- •Timeouts on USB: raise scope.timeout (5,000 to 10,000 ms) and avoid querying while the scope is busy autoscaling.
- •Scope not listed on Linux: USBTMC needs a udev rule granting your user access to the device, then replug.
- •LAN connection refused: confirm the scope and PC are on the same subnet and that the scope's LAN setting is enabled. Rigol scopes are LXI devices, so a ping test isolates network vs VISA problems.
- •Garbage waveform values: read the scaling factors after every acquisition change. The preamble values change when you rescale.
From one script to a validation workflow
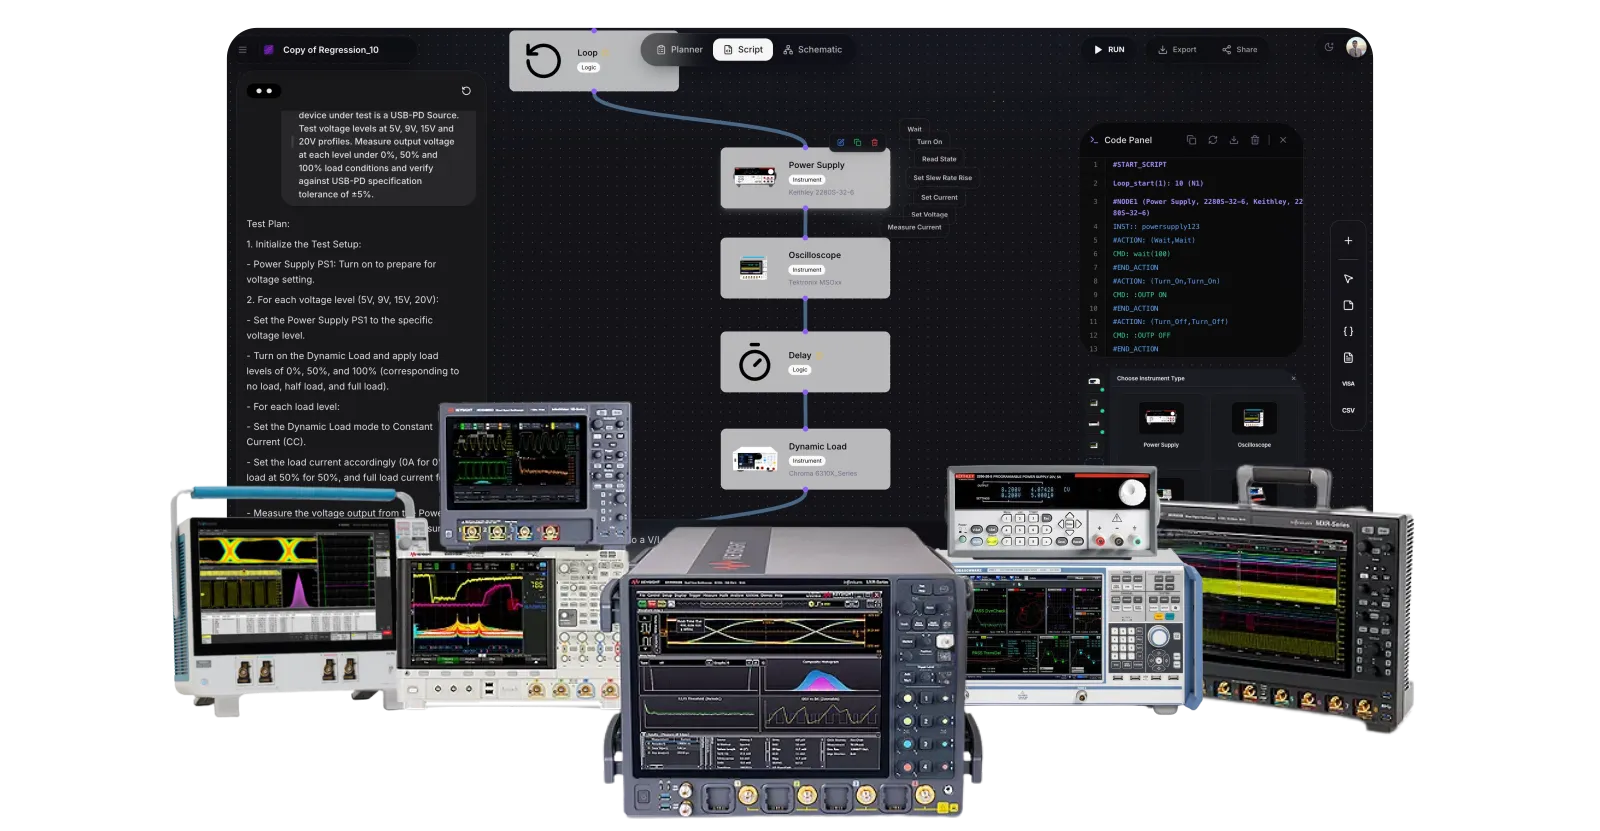
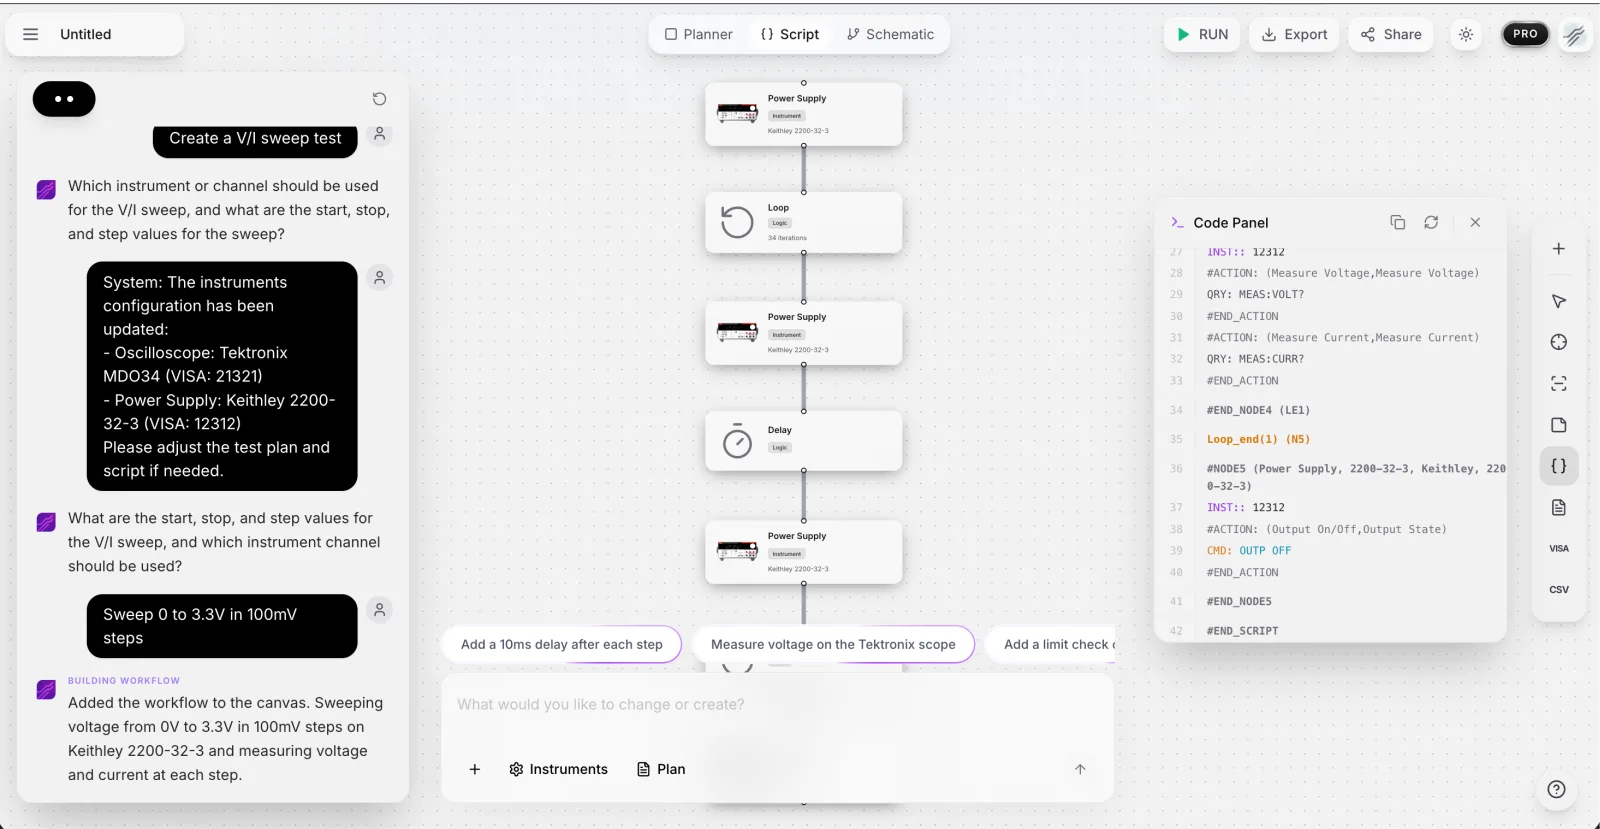
A script that measures one channel is 30 minutes of work. The real time sink is what comes next: sweeping conditions, synchronizing the scope with a power supply and a DMM, logging results, and turning them into a report your team can review. That glue code is where bench automation projects stall.
That layer is what TestFlow automates. You connect your instruments, Rigol included (pick manufacturer and model, paste the VISA address from Step 1), tell the agent what you want to test in plain English, and it generates the complete automation scripts and workflow in seconds, then runs them on your bench with live step-by-step results and a one-click PDF report. No per-vendor app, no NI hardware requirement, and it drives mixed benches: the same workflow can talk to your Rigol scope and a Keysight DAQ in one sequence.
If you are comparing approaches for the whole lab, start with the LabVIEW alternatives guide.
Frequently asked questions
Can I control a Rigol oscilloscope with Python? Yes. Rigol scopes speak SCPI over USB and LAN, and the pyVISA library lets Python send those commands. The DS1054Z and the rest of the DS1000Z series are fully scriptable.
What is the VISA address of a Rigol DS1054Z? Over USB it looks like USB0::0x1AB1::0x04CE::DS1ZA<serial>::INSTR, where 0x1AB1 is Rigol's vendor ID. Over LAN it is TCPIP0::<ip-address>::INSTR. pyvisa's list_resources() finds it.
Do I need NI-VISA to talk to a Rigol scope? No. pyvisa-py, the pure-Python backend, works with Rigol scopes over USB (with pyusb) and LAN. A vendor VISA like NI-VISA or Keysight IO Libraries also works.
How many waveform points can I read from a DS1000Z? In NORMal mode you read the 1,200 points shown on screen. To pull the deep internal memory you stop the acquisition and read in RAW mode in chunks.
Put your Rigol to work
The scope on your bench is fully scriptable. Start with the measurement script above, then let the agent handle the workflow around it.
Start free at app.testflowinc.com, connect your instruments, and turn a plain-English request into a running test in minutes.
Ready to automate your lab?
Connect your instruments, describe a test in plain English, and TestFlow builds and runs it in minutes.
Tags

TestFlow 2.0 is live now.Download it for Windows.
Experience the next generation of hardware validation. Run automated test sequences, capture clean data, and accelerate your time-to-market.