 Ali Kamaly
How to Automate Multimeter Measurements with Python (2026 Guide)
Driving a 6.5-digit bench multimeter from Python: the commands that matter, how NPLC trades speed against accuracy, buffered acquisition for fast logging, and a complete logger.
A bench multimeter is automated from Python with PyVISA: configure the function once, then trigger and read in a loop. The two things that separate a working logger from a fast, accurate one are understanding NPLC and using the instrument's buffer rather than querying point by point.
This guide covers connection, every common measurement function, the accuracy and speed trade, buffered acquisition, and a complete logging script.
Connect and identify
import pyvisa

rm = pyvisa.ResourceManager()
dmm = rm.open_resource("USB0::0x2A8D::0x1301::MY57200001::INSTR")
dmm.timeout = 10000

print(dmm.query("*IDN?").strip())
dmm.write("*RST")
dmm.write("*CLS")
*RST matters more on a DMM than on most instruments, because leftover configuration such as a manual range or a disabled autozero silently changes your results. See the PyVISA tutorial for backends and resource strings.
The measurement functions
| Measurement | Command |
|---|---|
| DC voltage | CONF:VOLT:DC <range>,<resolution> |
| AC voltage | CONF:VOLT:AC <range>,<resolution> |
| DC current | CONF:CURR:DC <range>,<resolution> |
| AC current | CONF:CURR:AC <range>,<resolution> |
| 2-wire resistance | CONF:RES <range>,<resolution> |
| 4-wire resistance | CONF:FRES <range>,<resolution> |
| Frequency | CONF:FREQ |
| Capacitance | CONF:CAP |
| Temperature (type K) | CONF:TEMP TC,K |
| Diode | CONF:DIOD |
| Continuity | CONF:CONT |
Then READ? to trigger and return.
dmm.write("CONF:VOLT:DC 10,0.00001")   # 10 V range, 10 uV resolution
voltage = float(dmm.query("READ?"))
Set the range explicitly rather than relying on autorange in a loop. Autorange adds a range-hunting delay to every reading and can produce a discontinuity in logged data when it switches.
NPLC: the accuracy and speed dial
The single most useful setting on a bench DMM and the one most often left at default.
dmm.write("VOLT:DC:NPLC 1")| NPLC | Time per reading (50 Hz) | Character |
|---|---|---|
| 0.02 | ~0.4 ms | Fast, noisy, no mains rejection |
| 0.2 | ~4 ms | Compromise |
| 1 | ~20 ms | Good mains rejection, sensible default |
| 10 | ~200 ms | Quiet, high resolution |
| 100 | ~2 s | Metrology, rarely needed |
NPLC 1 or higher rejects mains hum, because integrating over a whole number of line cycles averages the interference to zero. Below 1 you lose that, which is why fast logging is noisier in a way that no amount of averaging afterwards fixes.
Choose NPLC from the measurement, not from habit. A thermal soak logging at 1 Hz should use NPLC 10. A transient capture at 1 kHz has no choice but 0.02.
Fast buffered acquisition
Querying READ? in a Python loop caps out around 30 to 100 readings per second because each one is a round trip. For anything faster, let the instrument fill its buffer and read it in one transfer.
dmm.write("CONF:VOLT:DC 10,0.0001")
dmm.write("VOLT:DC:NPLC 0.02")
dmm.write("VOLT:DC:RANG:AUTO OFF")
dmm.write("VOLT:DC:ZERO:AUTO OFF")     # autozero doubles the time per reading
dmm.write("TRIG:SOUR IMM")
dmm.write("TRIG:COUN 1")
dmm.write("SAMP:COUN 10000")

dmm.write("INIT")                       # start filling the buffer
dmm.query("*OPC?")                      # block until complete
raw = dmm.query("FETC?")                # one transfer for all 10000

values = [float(v) for v in raw.strip().split(",")]
print(f"{len(values)} readings, mean {sum(values)/len(values):.6f} V")
Four settings do the work here:
- •`NPLC 0.02` for speed
- •`RANG:AUTO OFF` removes range-hunting between readings
- •`ZERO:AUTO OFF` removes the internal zero measurement that otherwise runs between readings and roughly halves throughput
- •`SAMP:COUN` fills the buffer without Python in the loop
Disabling autozero trades drift for speed. For a run under a minute this is fine. For a long soak, leave autozero on and accept the rate.
For very large buffers use binary transfer instead of ASCII:
dmm.write("FORM:DATA REAL,64")
values = dmm.query_binary_values("FETC?", datatype="d")
4-wire resistance
Below roughly 100 ohms, lead resistance is a significant fraction of what you are measuring.
dmm.write("CONF:FRES 100,0.001")
dmm.write("FRES:NPLC 10")
resistance = float(dmm.query("READ?"))
Connect both pairs at the device: the source pair carries the test current, the sense pair measures the voltage across the device only. Two-wire on a 50 milliohm shunt with 100 milliohms of leads reads three times the true value.
Temperature with a thermocouple
dmm.write("CONF:TEMP TC,K")
dmm.write("TEMP:TRAN:TC:RJUN:TYPE INT")   # internal cold junction
temperature = float(dmm.query("READ?"))
The cold junction reference is the accuracy limit. An internal reference is convenient and typically good to about a degree. For better, use an external ice-point or a fixed reference block.
A complete data logger
import csv
import time
import pyvisa

DMM_ADDR = "USB0::0x2A8D::0x1301::MY57200001::INSTR"
DURATION_S = 3600
INTERVAL_S = 1.0
LIMITS = (3.2, 3.4)

rm = pyvisa.ResourceManager()
dmm = rm.open_resource(DMM_ADDR)
dmm.timeout = 15000

rows = []
try:
    print(dmm.query("*IDN?").strip())
    dmm.write("*RST"); dmm.write("*CLS")
    dmm.write("CONF:VOLT:DC 10,0.00001")
    dmm.write("VOLT:DC:NPLC 10")          # quiet, slow logging
    dmm.write("TRIG:SOUR IMM")

    error = dmm.query("SYST:ERR?").strip()
    if not error.startswith(("0,", "+0,")):
        raise RuntimeError(f"configuration rejected: {error}")

    start = time.time()
    next_sample = start
    while time.time() - start < DURATION_S:
        next_sample += INTERVAL_S
        value = float(dmm.query("READ?"))
        elapsed = time.time() - start
        verdict = "PASS" if LIMITS[0] <= value <= LIMITS[1] else "FAIL"
        rows.append({"t_s": round(elapsed, 3), "volts": value, "verdict": verdict})

        if verdict == "FAIL":
            print(f"{elapsed:8.1f} s  {value:.6f} V  OUT OF LIMITS")

        sleep_for = next_sample - time.time()
        if sleep_for > 0:
            time.sleep(sleep_for)

finally:
    dmm.close(); rm.close()

with open("log.csv", "w", newline="") as f:
    writer = csv.DictWriter(f, fieldnames=["t_s", "volts", "verdict"])
    writer.writeheader(); writer.writerows(rows)

fails = [r for r in rows if r["verdict"] == "FAIL"]
print(f"{len(rows)} samples, {len(fails)} out of limits")
Note the timing approach. next_sample += INTERVAL_S schedules against a fixed grid rather than sleeping a fixed amount after each reading. The naive version accumulates the measurement time into the interval, so a "1 Hz" log at NPLC 10 actually runs at about 0.83 Hz and drifts further the longer it runs.
Accuracy checklist
Before trusting a number to six digits:
- •Warm up. 30 to 60 minutes from cold for specified accuracy. This is not optional and it is the most common cause of an unexplained offset.
- •Check calibration date. Specifications are stated against a calibration interval.
- •Use 4-wire for anything below 100 ohms or where lead drop matters.
- •Watch thermal EMF. Dissimilar metals at connections generate microvolts that matter at high resolution. Copper to copper where you can.
- •Mind the range boundary. Accuracy is specified as a percentage of reading plus a percentage of range, so measuring 1 V on the 1000 V range is far worse than on the 10 V range.
- •Keep NPLC at 1 or above whenever mains hum could reach the signal.
Triggering and synchronising with other instruments
The measurements above are self-triggered, which is fine when nothing else is moving. When a supply is stepping or a generator is firing, you need the DMM to measure at a known moment.
External trigger, where another instrument tells the DMM when to measure:
dmm.write("TRIG:SOUR EXT")
dmm.write("TRIG:SLOP NEG")
dmm.write("SAMP:COUN 1")
dmm.write("INIT")                  # armed, waiting for the trigger edge
# ... the generator or supply fires, the DMM measures ...
value = float(dmm.query("FETC?"))
Software trigger, where your script decides:
dmm.write("TRIG:SOUR BUS")
dmm.write("INIT")
psu.write("VOLT 3.6")              # make the change
time.sleep(SETTLE_S)
dmm.write("*TRG")                  # measure now
value = float(dmm.query("FETC?"))
The INIT then FETC? pattern is the important part. INIT arms the instrument and returns immediately, so the DMM is already waiting when the event happens. Using READ? instead means the DMM only starts measuring after your script asks, which adds a round trip of uncertainty to the timing.
Trigger delay lets the instrument handle settling rather than your script:
dmm.write("TRIG:DEL 0.05") # 50 ms after the trigger, then measureThis is more repeatable than time.sleep() in Python, because it is timed by the instrument rather than by an operating system that may be doing something else.
Statistics without transferring every point
For long runs where you only need the summary, the instrument can compute it and save the transfer entirely.
dmm.write("CALC:AVER:STAT ON")
dmm.write("SAMP:COUN 10000")
dmm.write("INIT")
dmm.query("*OPC?")

average = float(dmm.query("CALC:AVER:AVER?"))
minimum = float(dmm.query("CALC:AVER:MIN?"))
maximum = float(dmm.query("CALC:AVER:MAX?"))
stdev   = float(dmm.query("CALC:AVER:SDEV?"))
count   = int(float(dmm.query("CALC:AVER:COUN?")))

print(f"{count} samples: mean {average:.6f} V, "
      f"range {minimum:.6f} to {maximum:.6f}, sd {stdev:.6f}")
Five queries instead of a 10,000-point transfer. Use this for pass and fail checks on stability, and transfer the full record only when you need to see the shape of what happened.
Range: the setting that silently costs you accuracy
Autorange is convenient and it is the wrong default for a logging script. Two reasons, and both bite quietly.
The first is speed. An autoranging DMM re-hunts the range on every reading when the signal sits near a boundary, which adds tens of milliseconds per point and makes your sample interval irregular. The second is worse: a range change mid-log produces a step in the recorded data that looks like a real event in the DUT.
dmm.write("CONF:VOLT:DC 10,0.0001")   # fixed 10 V range, 100 uV resolution
dmm.write("VOLT:DC:RANG 10")          # explicit, belt and braces
dmm.write("VOLT:DC:RANG:AUTO OFF")
Pick the range from the largest value the test can legitimately produce, not the nominal one. A 3.3 V rail that can overshoot to 3.9 V during a transient belongs on the 10 V range, not on whatever autorange chose while the DUT was idle.
The accuracy consequence is worth knowing precisely: DMM accuracy is specified as a percentage of reading plus a percentage of range. On the 10 V range, the range term is fixed regardless of whether you are measuring 3.3 V or 9 V, which is why measuring a 3.3 V rail on the 1000 V range is so much worse than it looks. See read a digital multimeter datasheet for how to turn those two terms into an actual uncertainty number.
Choosing NPLC in practice
The NPLC section above explains the dial. This is the table for picking a value without experimenting.
| NPLC | Reading rate (60 Hz mains) | Use it for |
|---|---|---|
| 0.02 | ~300/s | Fast scans where you only need 4.5 digits |
| 0.2 | ~50/s | General logging, the sensible default |
| 1 | ~10/s | Good mains rejection, most characterisation work |
| 10 | ~1/s | Low-level DC, thermocouples, high-accuracy points |
| 100 | ~0.1/s | Calibration-grade measurements only |
NPLC of 1 or above gives you integer-cycle integration, which rejects mains hum. Below 1 you lose that, which is why a 0.02 NPLC log of a millivolt signal looks noisy and the same signal at NPLC 10 does not. If your readings wobble by a few counts and the wobble goes away when you raise NPLC, it was mains, not the DUT.
Common mistakes
- •Leaving autorange on in a logging script. Covered above. Fix the range.
- •Using `MEAS:VOLT:DC?` in a loop. That is configure-plus-read every iteration and it is slow. Configure once with
CONF:, then loopREAD?or use the buffer. - •Ignoring the mains frequency setting.
SYST:LFR 50or60. Wrong value means NPLC integration no longer aligns with the mains cycle and rejection disappears. - •Not flushing the log file. A crash at hour nine should not cost hours one to eight. Call
fh.flush()per row on long runs. - •Two-wire resistance below about 100 ohms. Lead resistance is a significant fraction of the reading. Use 4-wire.
- •Forgetting the settling time after switching function. Changing from DC volts to resistance is not instantaneous, and the first reading after the change is often wrong.
- •Trusting the last digit. Resolution is not accuracy. The datasheet's percentage-of-reading plus percentage-of-range formula is the real number.
Related reading
- •PyVISA tutorial
- •Keysight 34465A SCPI commands, model-specific detail
- •Read a digital multimeter datasheet, understanding the accuracy specification
- •How to automate a VI curve sweep, the DMM in a multi-instrument test
- •Multimeter software automation
- •SCPI command cheat sheet, the commands for other instrument classes
- •Instrument control with VISA and SCPI, the protocol layer
- •Keysight 34461A datasheet, a worked accuracy specification
- •Automate a Keysight power supply with Python, the stimulus half
- •GPIB vs USB vs LAN, why buffered reads matter
- •Automated test report generation, what to do with the log
- •Python instrument control libraries compared, what to build on
- •Free instrument control software, the zero-cost stack
- •Best data acquisition system, when one DMM is not enough
- •NI TestStand alternatives, sequencing many measurements with limits
Where TestFlow fits
Logging a voltage is easy. Logging it while stepping a supply, checking limits, and producing a signed report is the actual job, and that is the part worth generating.
- 1
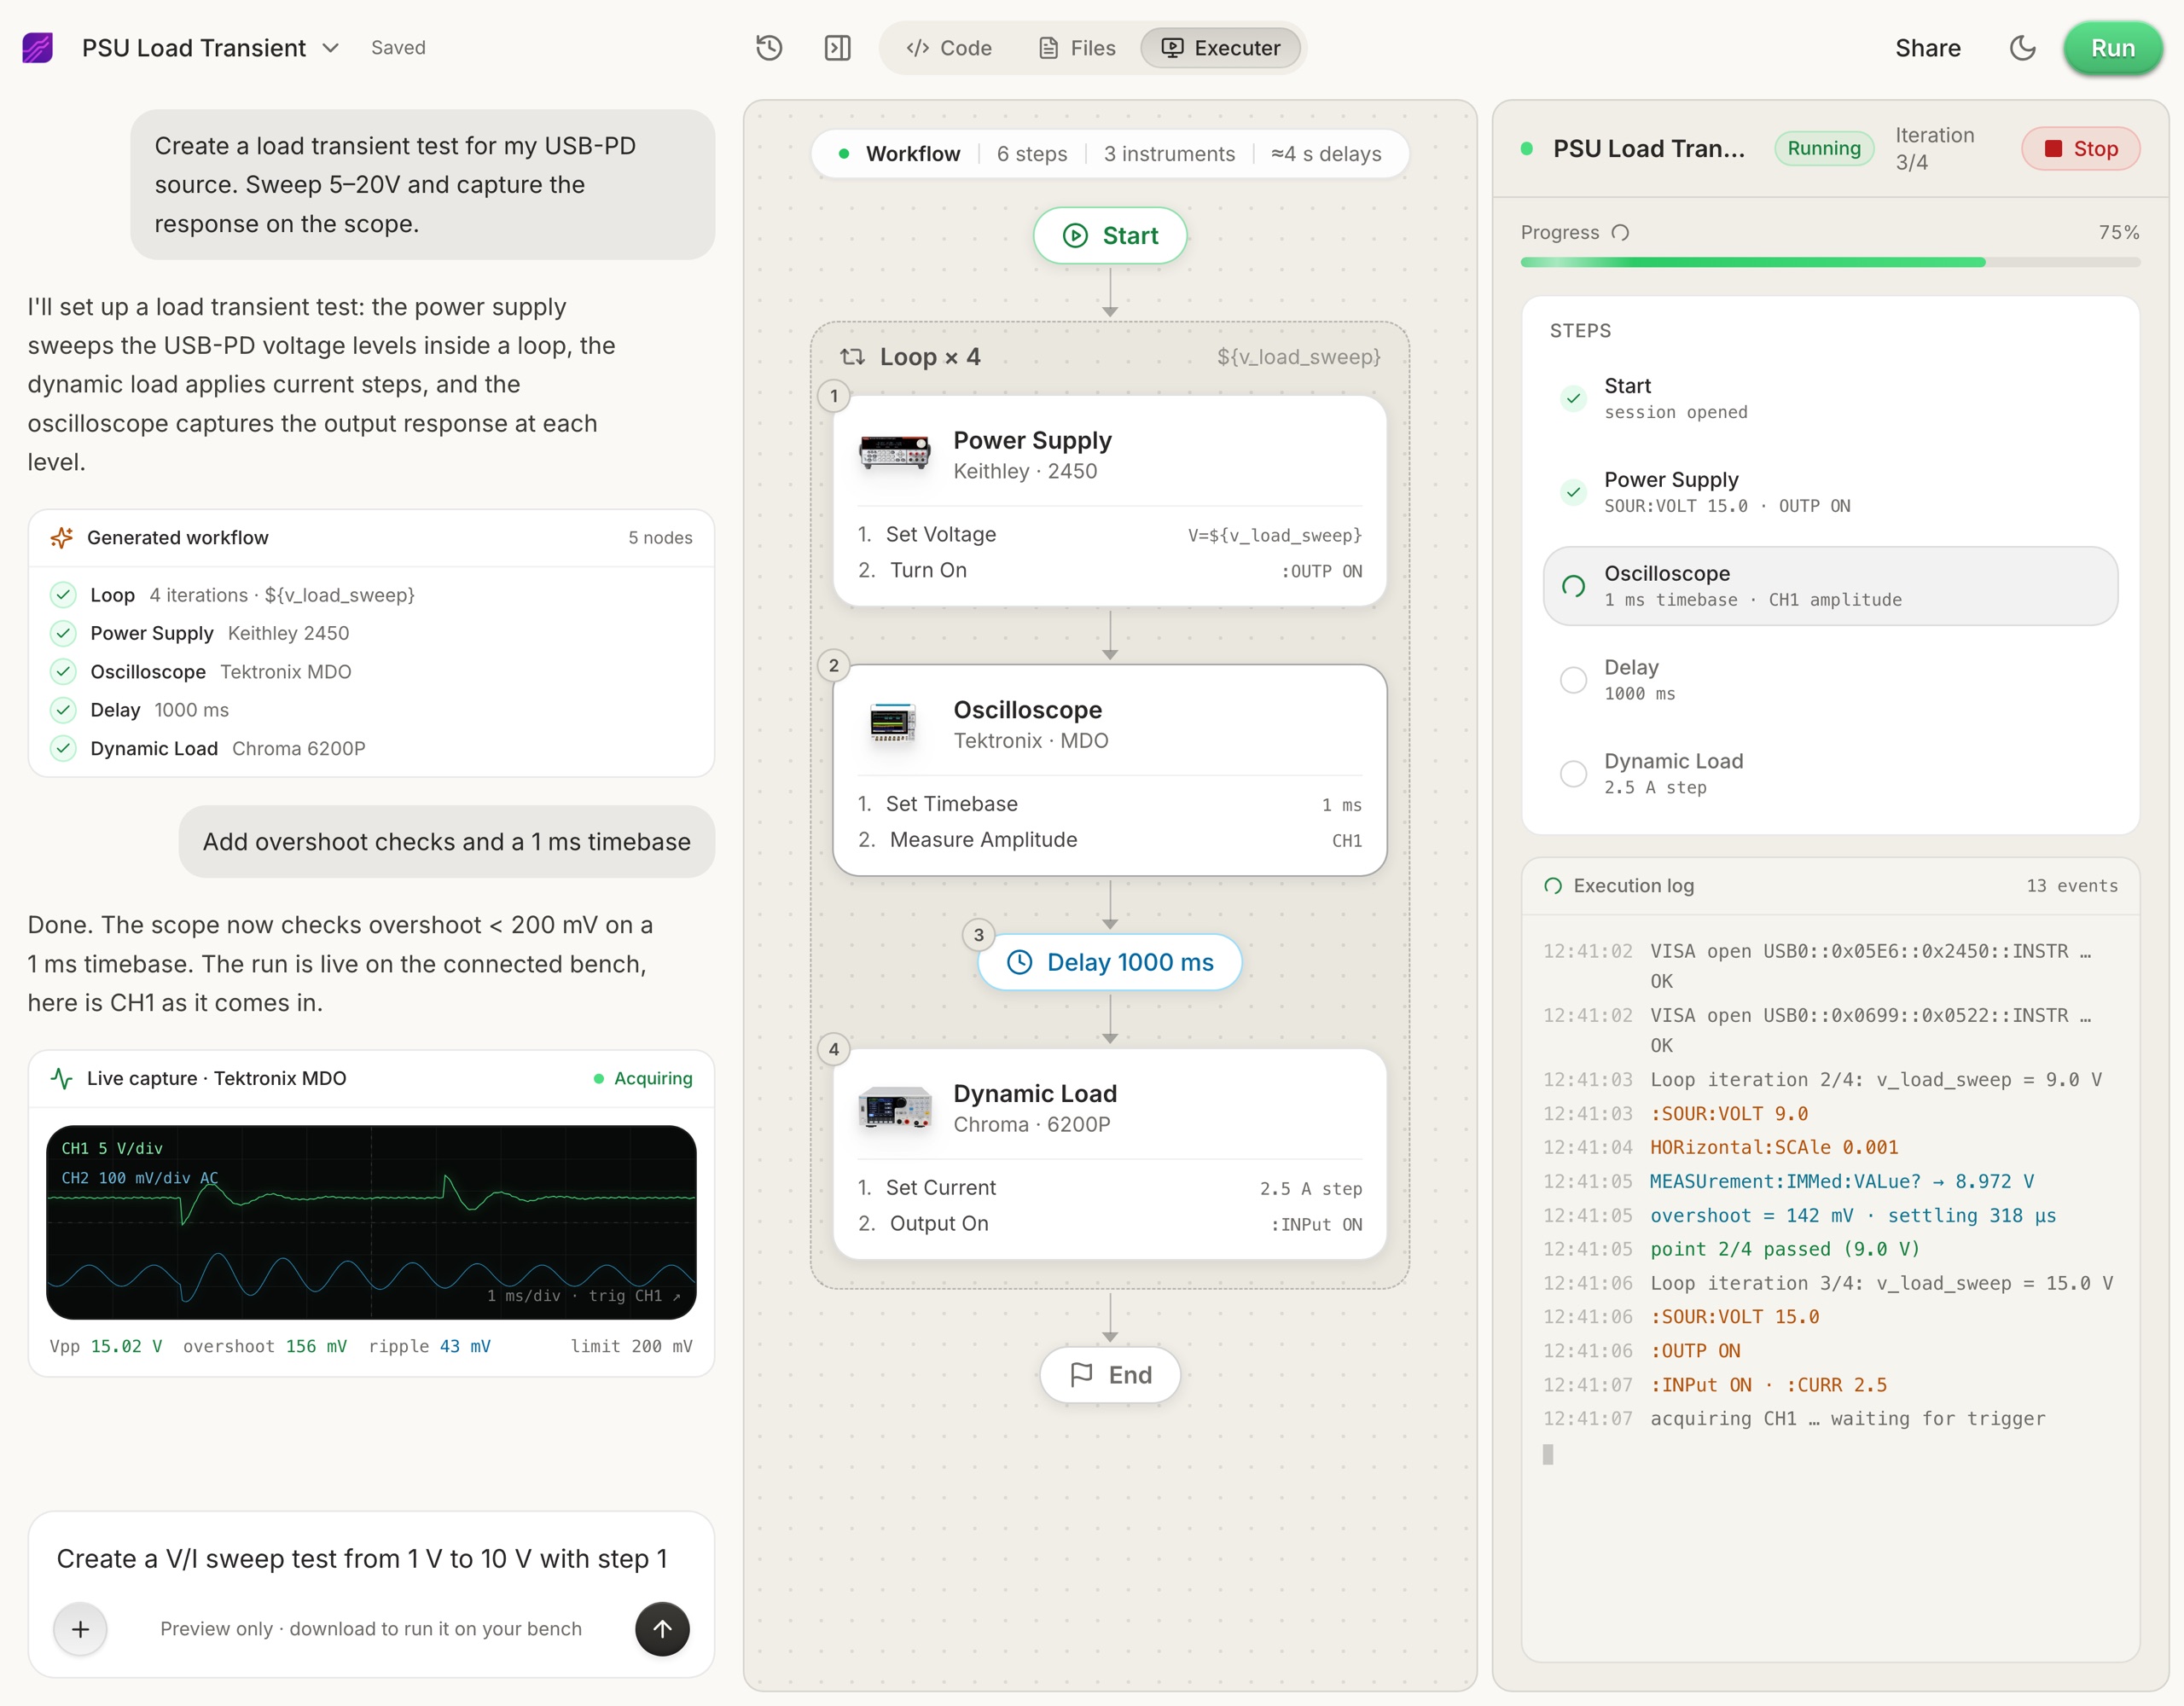
Connect your instruments. Pick the manufacturer and model, paste the VISA address (USB, LAN, GPIB, or serial), and the agent knows what is on your bench. No bench yet? Use a placeholder address, build the full automation, and swap in the real address when you are in the lab.
- 2
Tell the agent what to test, in plain English. For example, "run a VI sweep from 1 to 10 V in 1 V steps at 0.5 A load current," or "suggest the tests for a power-management device."
- 3
The agent builds the complete workflow in seconds. Instrument-aware automation appears on the canvas, with the generated scripts visible in a code panel you can inspect and edit.
- 4
Run it in your lab. Click Run and the status panel streams results step by step, with measured values inline (VOUT = 3.301 V, asserted 3.2 to 3.4 V, PASS). One click exports a structured PDF report, or the raw results as CSV.
- Vendor-neutral by design. One workflow drives Keysight, Tektronix, Rohde & Schwarz, NI, Rigol, Keithley, Anritsu, and more over standard VISA and SCPI.
- Browser-based and shareable. Workflows live in your workspace, so a sequence built in one lab runs the same way in another.
- Free version to start. Sign in at app.testflowinc.com and build your first workflow today; plans and quotes are on the pricing page.

The step-by-step walkthrough, VISA address formats, and Test Planner prompts are all in the TestFlow product guide.
Frequently asked questions
How do I read a voltage from a multimeter in Python?
Open the instrument with PyVISA, configure the function with CONF:VOLT:DC, then query READ? which triggers a measurement and returns it as a string you convert to float.
What is NPLC on a multimeter?
Number of power line cycles, the integration time for each reading. Higher NPLC means a longer measurement, less noise, and better mains hum rejection. NPLC 1 is a good default, NPLC 10 for quiet high-resolution work, NPLC 0.02 for speed.
What is the difference between MEAS, READ, and FETCh?
MEAS configures, triggers, and returns in one command, which is simple but slow in a loop. READ triggers and returns using the existing configuration. FETCh returns the last result without triggering. Use CONF once then READ in a loop.
How do I take fast measurements with a DMM?
Lower NPLC, disable autorange and autozero, configure a sample count, and read the whole buffer at once with INIT then FETCh rather than querying point by point. Round-trip latency dominates at high rates.
How do I do a 4-wire resistance measurement?
Use CONF:FRES instead of CONF:RES, and connect both the source and sense terminal pairs to the device. Four-wire removes lead resistance from the reading, which matters below roughly 100 ohms.
Why does my multimeter reading drift?
Usually thermal EMF at connections, autozero disabled, or insufficient warm-up. Bench DMMs need 30 to 60 minutes to reach specified accuracy. For low-level DC, also check for dissimilar metal junctions in the path.
Ready to automate your lab?
Connect your instruments, describe a test in plain English, and TestFlow builds and runs it in minutes.
Tags
Put it on your bench this week
A new way for testing, from specs to automated sequences, capture clean data, and accelerate your validation cycle.